A sweet set of mugs designed by Createca for Ru'cucu. Dishwasher and microwave proof, each one depicts a silhouette of an animal batting a teabag. Can be customised to show any animal of choice! Visit the shop for more details!
Thursday, 3 January 2013
Wednesday, 2 January 2013
Creechers
Kooky, squashy, and ecological, these little Creechers are perfect to guard your keys, wallet or just hang around!
Each one has been hand sewn, made from 100% recycled materials and is completely distinct from the next.
Tuesday, 11 December 2012
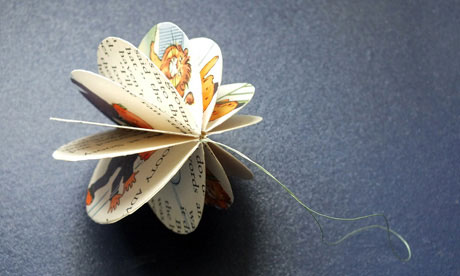
Christmas paper baubles
This is a great craft post found at The Guardian newspaper website: simple, and quick, and ultimate satisfaction! It's a fun pre-Christmas craft to do yourself or with kids. I think it should be pretty easy to do with children from about 8, although a certain amount of patience is needed, and the ability to wield a pair of scissors and cut circles :)
For the project you will need:
●a few sheets of paper (Katy Stoddard of The Guardian used vintage children's books, for a mix of text and colour pictures)
●a pencil
●something round to use as a template (like a 5cm-diameter spice jar)●scissors●pritt stick●thread
●sticky tape
Procedure:
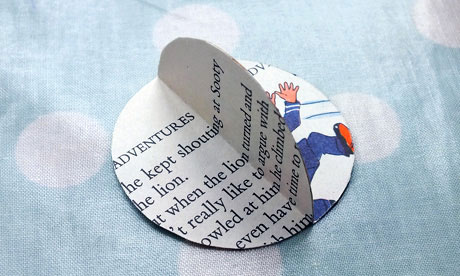
○ Place your paper on a flat surface and draw circles around the template. Try to capture any interesting bits of text or colourful drawings, which will make your bauble stand out. You will need 12 circles for each bauble.
● Cut out each circle and fold in half, with the side you want to be seen on the inside. Carefully trim any uneven edges if necessary.
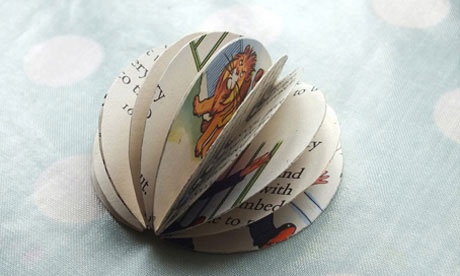
● Take a folded circle, glue one side, then stick a second folded circle to it, making sure the straight edges line up neatly.
○ Repeat, adding each circle and trimming any uneven edges as you go. DON'T glue the final two sides together yet - we need to add a thread to hang the bauble!
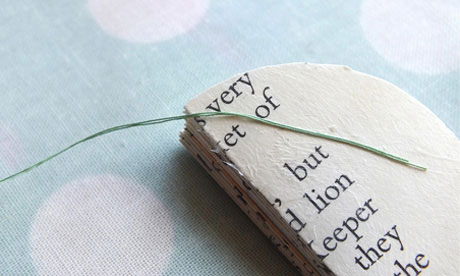
● Cut a length of thread and double it over to create a loop.
● Place your bauble on a flat surface and attach the cut ends of the thread (not the loop) the inside of the bauble with sticky tape(make sure your text/images are the right way up or your bauble will hang upside down!). leave a couple of centimetres of thread to stuck into the globe, to make the loop secure.
(nb In the original design, Katy suggests using glue, but I think sticky tape is easier, especially with kids)
○ Now to finish the bauble. Get hold of the semi-circles at each end and bring them round towards each other, so that the segments fan out into a globe shape. Glue these two sides together, so that the thread is wedged between them.
● Once the glue is dry your bauble is ready to hang! Experiment with different-sized circles, use more circles to make a denser bauble, or decorate your circles with glitter before you glue them together for some added Christmas sparkle.
Thursday, 9 February 2012
Perfil de Flora

NOMBRE: FloraSOBRE: A pesar de que vive y ha vivido siempre en Sevilla, un lugar muy caluroso en verano, Flora ha estado trabajando con lana desde que era una niña y, de hecho, diseñó su primera ropa de punto cuando sólo tenía 17 años. Con el tiempo se ha ido especializando en tejido de punto, ganchillo y punto de cruz, pero le sigue gustando experimentar con hilos y todo tipo de lana. Su repertorio incluye colchas, ropa, cuadros y tapetes.
Impulsada por el deseo de crear con sus manos, Flora se inspira en todo lo que la rodea. Su familia y amigos han jugado siempre un papel relevante en sus proyectos, sobre todo como fuente crítica de su labor a la par que, muchas veces, destinatarios de su trabajo. Atribuye su creatividad y afición a su madre, la cual fue, en parte, su maestra en el mundo de las labores. Flora no sólo intenta dar cauce a una profunda vocación sino que siempre ha considerado su trabajo como un modo de relajación, auténticamente terapéutico. Por otro lado, no hay cosa que le guste más, que conocer gente con intereses similares con el fin de compartir ideas y nuevos retos.
Para más información sobre estas clases y para ver una lista de piezas, actualmente en venta, visita el espacio!
NAME: FloraABOUT: Despite the fact that she lives in Seville, which gets very hot in the summer, Flora has been working with wool since she was a child, and designed her first knitted item of clothing when she was only 17. She specializes in knitting, crochet and cross-stitch, and especially likes experimenting with unusual yarns and wool. Her repertoire includes quilts, clothing, pictures and rugs.
Driven by a strong desire to create with her hands, Flora is inspired by everything around her. Her family and friends have always held important roles in her projects, above all supplying helpful critiques of her work, which often ends up being given to them. Flora attributes her creativity to her mother, who was to a large extent her 'maestra'. Flora is in the process of developing her vocation and has always considered her work a way of relaxation, and truly therapeutic. Above all, she loves nothing more than meeting people with similar interests in order to share ideas.
For more information about these classes and to see a list of pieces currently for sale, watch this space!
Wednesday, 1 February 2012
Perfil de Cristina
NOMBRE: CristinaSOBRE: Cristina es una artista muy versátil, con un trabajo que va desde crochet hasta cojines y desde la fotografía hasta la cocina. Afincada en un pequeño pueblo a las afueras de Sevilla, Cristina ha sido galardonada con premios tanto por su crochet como por su fotografía. Realiza proyectos de arte desde que era apenas una niña, dice que la mayoría de sus técnicas de crochet las ha recogido de la gente creativa que le rodean. Su trabajo ha sido, en su mayoría, inspirado por sus amigos y familia, en particular, su madre, pero también con sólo mirar a la gente en la calle. Recientemente ha estado trabajando en una aclamada serie de juguetes de ganchillo (amigurumis) que a su vez inspiró a muchos de lo que lo vieron a buscar clases de crochet, que Cristina les da con mucho gusto.
Para más información sobre estas clases y para ver una lista de piezas, actualmente en venta, visita el espacio!
NAME: CristinaABOUT: Cristina is an extremely versatile artist, with work ranging from crochet to cushions, photography to food. Based in a little village just outside Seville, Cristina has been awarded prizes both for her crochet and for her photography. Cristina, who has been creating craft projects since she was just a little girl, says that most of her crochet and knitting techniques have been picked up from the creative people who have always surrounded her. Her work has mostly been inspired by her friends and family, in particular her mother, but also by just watching people on the street.
Recently she has been working on a highly acclaimed series of amigurimi crochet toys which have in turn inspired many who have seen them to seek classes in Crochet, which Cristina gives gladly.
For more information about these classes and to see a list of pieces currently for sale, watch this space!
Friday, 27 January 2012
Llamada para Artistas en Andalucía!
Si eres un@ artista, artesan@, músico, diseñador@, modista, pintor@ escultor@, cociner@, pasteler@, fotograf@, ilustrador@, escritor@...○ estás interesad@ en ser parte de un grupo de creativ@s que están localizados en Andalucía...● estás apasionad@ por apoyar nuestro medio ambiente y economía local...● y quieres tener la oportunidad tener tu trabajo anunciado GRATIS en la web,
PONTE EN CONTACTO CON NOSOTROS!
Puedes encontrarnos en
If you are an artist, artisan, musician, designer, fashion designer, painter, sculptor, chef, baker, photographer, illustrator, writer etc ...○ and you're interested in being part of a creative group based in Andalusia..● and you're passionate about the environment and supporting the local economy● and you want an opportunity to have your work advertised FREE on the internet,
GET IN TOUCH WITH US!
Friday, 4 November 2011
The Surin Elephant Roundup
Background:
Every November, Surin, a north-eastern province in Thailand, holds its annual Elephant Roundup,
one of Thailand's most popular festivals. The Inhabitants of Surin
were renowned for catching and training elephants, who have been a
prominent feature of Thai art, literature and legend, thanks to their
importance both in labour and war. The Mahout and his
elephant have a special relationship; in daily life man and elephant
need to depend on each other, and as such the elephant is usually
treated as part of the 'family'. This life-long relationship is an
integral element of Kui culture, tradition and the way of life.
Nowadays Thai elephants are almost exclusively bred instead of captured due to their dwindling numbers in the wild, and
the Surin Elephant Roundup show has been held annually since 1960 to
commemorate the importance of the elephant and his trainer. The
Roundup takes place over two days and includes an elephant buffet,
elephant talent competitions, demonstration of the various techniques
used to train elephants, a presentation of ancient elephant warfare
techniques, a tug-of-war between men and elephants, and possibly the
most popular event, 'elephant football'.
The Craft Class:
The
aim of this class is to introduce the concept of the elephant roundup
and all the truly amazing things that elephants can do. Vocabulary
includes actions and phrases such as 'dance' 'eat breakfast' and 'play
games'. Materials include flash cards, a short film, a cut-out
elephant, a mask, and various worksheets for early-finishers. You'll
also need a projector or laptop, loads of crayons, scissors and some
sellotape.
For the main project you will need:
●scissors
●pencils and pens
●cello-tape.
You will also need:
1 copy of the flash cards
A copy of each of the handouts per child
A photocopy of the elephant (printed on card-stock)
A photocopy of the elephant mask (aso printed on card-stock)
Procedure:
○ Start with a quick game of 'instructions', speeding up little by little as you go (stand up, turn around etc). Add a few new 'animal instructions' and demonstrate what you mean (be a tiger, be a giraffe, be an elephant).
● Show the flash cards and elicit the vocabulary. Act the actions as you go (Dance, Play Football, Play Games, Paint, Fight, Eat Breakfast). Drill pronunciation and stick cards around room for a quick game of 'say and point'.


● Ask kids which animal can do all the actions in the flashcards. Encourage all guesses, but if they don't seem to be getting near, give them a little hint or two. When they've got it, show surprise and ask if they're sure. Then hit 'em with the video! Try to encourage them to call out the actions that the elephants are doing (a bit weird in present simple, but if they're not at continuous stage yet, you can ask them "what can the elephant do" instead or "what is it doing")
For the main project you will need:
●scissors
●pencils and pens
●cello-tape.
You will also need:
1 copy of the flash cards
A copy of each of the handouts per child
A photocopy of the elephant (printed on card-stock)
A photocopy of the elephant mask (aso printed on card-stock)
Procedure:
○ Start with a quick game of 'instructions', speeding up little by little as you go (stand up, turn around etc). Add a few new 'animal instructions' and demonstrate what you mean (be a tiger, be a giraffe, be an elephant).
● Show the flash cards and elicit the vocabulary. Act the actions as you go (Dance, Play Football, Play Games, Paint, Fight, Eat Breakfast). Drill pronunciation and stick cards around room for a quick game of 'say and point'.


● Ask kids which animal can do all the actions in the flashcards. Encourage all guesses, but if they don't seem to be getting near, give them a little hint or two. When they've got it, show surprise and ask if they're sure. Then hit 'em with the video! Try to encourage them to call out the actions that the elephants are doing (a bit weird in present simple, but if they're not at continuous stage yet, you can ask them "what can the elephant do" instead or "what is it doing")
Uploaded by phumin00 on youtube.
○ At this point decide if you want to do a map thing or not. I tend to pull up a world map on the whiteboard and help them find Spain and the UK before letting them guess a bit as to where Thailand is. When they find it I give them the handout and get them to colour and label the 3 countries. I'm doing this with each Craft and Culture class, so the students that come back are getting a bit of a collection!
● They
are now ready to make their 3D elephants. You've got to keep a really
strict eye on time, as they will have to colour in both sides of the
elephant, cut them out and still have time for the mask and a worksheet or two!
*ADVICE* Don't do what I did which was to give them the option of colouring-in with pens. It takes too much time and the pens run out! Best to stick to the old favourites: pencils or crayons.
● When they've coloured in the first side, get them to cut them out, flip 'em round and colour the backs. Give them a piece of scrap paper each to protect the tables from wild colouring-in skilz ;) Finally, show them how to cut the slits and construct the elephant, adding a bit of sellotape to the legs and ears as you go so they don't fall off.
*ADVICE* Don't do what I did which was to give them the option of colouring-in with pens. It takes too much time and the pens run out! Best to stick to the old favourites: pencils or crayons.
● When they've coloured in the first side, get them to cut them out, flip 'em round and colour the backs. Give them a piece of scrap paper each to protect the tables from wild colouring-in skilz ;) Finally, show them how to cut the slits and construct the elephant, adding a bit of sellotape to the legs and ears as you go so they don't fall off.

○ As each kid finishes off, you can give them a photocopy of the mask to colour in and cut out. The littler students will need help cutting out the eyes of the mask, and attaching the string.
● For early finishers, now is a great time to give out the colouring-in handouts. Or if you're tight on time, staple them to the back of the map and tell them they can do it at home!
Y ya 'sta! Elefantastic! :DThursday, 27 October 2011
Pum'kin love!
Another year, another Halloween, and what better way to celebrate it than with food and something crafty? This
year I thought I'd try to push the pumpkin-carving skills little
further than just sticking a knife into it and making holes, and also
get to grips with making my first pumpkin soup. The Guardian newspaper got me started with a short article on how to carve, and a link to this guy, who is possibly the worlds most amazing pumpkin-carver EVER! Now fully inspired I was ready to go out and buy me a pum'kin!
The
best thing about making a pumpkin lamp is that you get to eat the
insides as well. Now I've never really been keen on pumpkin pie, but I'd
never say no to a pumpkin soup. I found this recipe
on the bbc website. I've changed it just a little by using the pumpkin
seeds from the pumpkin instead of buying them. More on how to roast them
later.
Ingredients
- 4 tbsp olive oil
- 2 onions , finely chopped
- 1kg pumpkins or squash (try kabocha), peeled, deseeded and chopped into chunks
- 700ml vegetable stock or chicken stock
- 142ml pot double cream
- 4 slices wholemeal seeded bread
- handful pumpkin seed from a packet
Serves 6
Prep 20 mins
Cook 25 mins
- Heat half the olive oil in a large saucepan, then gently cook the onions for 5 mins, until soft but not coloured. Add the pumpkin to the pan, then carry on cooking for 8-10 mins, stirring occasionally until it starts to soften and turn golden.
- Pour the stock into the pan, then season with salt and pepper. Bring to the boil, then simmer for 10 mins until the squash is very soft. Pour the cream into the pan, bring back to the boil, then purée with a hand blender. For an extra-velvety consistency you can now push the soup through a fine sieve into another pan. The soup can now be frozen for up to 2 months.
- While the soup is cooking, slice the crusts from the bread, then cut the bread into small croutons. Heat the remaining olive oil in a frying pan, then fry the bread until it starts to become crisp. Add the seeds to the pan, then cook for a few mins more until they are toasted. These can be made a day ahead and stored in an airtight container. Reheat the soup if needed, taste for seasoning, then serve scattered with croutons and seeds and drizzled with more olive oil, if you want.
Yes. It really IS as good as it looks! Roasting
the seeds was relatively easy. All you have to do is wash them in a
bowl and try to take off all the gooey pumpkin strings you can. You then
have to thoroughly dry them. This could be done with a hair dryer, or
(as I did) you could just go out for a drink with friends and come back
and hour or two later. Then:
- Pre-heat the oven to 135 C (275 F)
- Melt a tablespoon of butter and a table spoon of margarine, and mix in a squirt of lemon juice, a tablespoon of oregano, a splattering of cinnamon and a pinch or two of salt.
- Take the mixture off the heat, add the pumpkin seeds and mix them in well.
- Spread the seeds on some tinfoil and stick them in the oven for about 20 mins until golden brown
The
last step was the carving of the pum'kin itself, which I did with an
apple-peeler knife. I think it came out quite well! This is the first
time I've tried peeling the skin off the face of the pumpkin to add
depth, and added a chimney to the top. I also tried the technique of
smothering it all in Vaseline to try to extend its life. It has to last
until Monday after all, if the kids at school are going to get to see
it! Does anyone else there feel the pum'kin
love? I'd love to know what squash-related activities you get up to,
and see any photos of your pumpkin lanterns!
Friday, 25 March 2011
Spring Flowers
The Craft Class:
A bright and cheerful project to welcome back our long-lost friend Spring!
There
are some fiddly bits in this project but I managed it with about 8
students between the ages of 8 and 10 last week, and nine 6-7 year olds
today :)
For the main project you will need:
●scissors
●pritt-stick type glue
●a pencil
●some newspaper (to protect their sticking surfaces!)
●cello-tape.
3 strips of green paper (to wrap around skewers) (about 1,5 x 21 cm)
3 green drinking straws
Procedure:
●scissors
●pritt-stick type glue
●a pencil
●some newspaper (to protect their sticking surfaces!)
●cello-tape.
They will also each need:
FLOWERS
1 pre-cut circle a little bigger than a euro coin
3 strip of yellow or orange card (about 11x3 cm)
12 little squares of different coloured paper (roughly 8x8 cm)
STEMS AND LEAVES
3 wooden skewers (pinchos) cut to 3 different sizes
3 green drinking straws
1 A5 green sheets of paper
POT
One plastic cup (preferably coloured)
One small stone (for the base of the cup)
A small block of polystyrene that fits snuggly into the cup
Procedure:
○ Ask the children what season it is, and drill 'spring'. Draw a flower in a pot on the board and label it
together (PETALS, STEM, LEAF, EARTH and POT). Play a couple of
memory games, and get the kids to copy the flower on a piece of paper,
colour and label it, and finally make a paper frame for the picture. It took more or less between
1/2 hour and 45 mins for the younger lot.
● Give
out the pre-cut circles and the small strip of yellow or orange card
and get the students to trace around the stencil 2/3 times. Cut out and
put aside.
● Next
hand out 4 of the coloured squares of paper. The kids can chose
whichever colours they want, but it's best to have a minimum of 2
different colours.
Get the kids to cut 4 strips about a centimeter wide of 2 of the colours. Put the rest of the paper to one side for now.
○ Take the first 4 strips and stick one end of each around the circle, making a cross.
● Fold each strip in half and glue the ends to the circle.
● Stick the other 4 strips in the spaces in between, stick, fold, and stick the ends in place again. Put the flower-head aside, and then repeat the whole process 2 more times to end up with 3 complete flower heads.
○ Give
the children the A5 green paper, and get to fold it 4 times length
ways. Show them how to draw a leaf shape (taking up the full length of
the paper). Cut the leaf through all 4 layers. Put 3 of the leaves
aside but on the last one, get them to trace around their circular
stencils 3 more times. Cut out the circles and put them aside with the
leaves.
●
● Take one of the flower heads and glue the end of one of the stems to the back of the flower. Repeat for all 3. Take the three green circles that they made with the leaves and stick them over the stem for the back of the flower.
○ Give them the biggest wooden skewer, and show them how to measure it against one of stems. Tell them they will have to cut the
● Stick the skewers carefully up the paper stem-tubes, blunt-side first.
● Attach the leaves to the base of the stem, pinch in place and attach with cello-tape. Fold leaf over and down. Repeat for all flowers.
○ Put the stone in the bottom of the plastic cup, fit the polystyrene in as snuggly as possible, and stick the flowers in.
● If you have any early finishes, you could get them to make mini butterflies to stick on the flowers.
YA ESTA!
:)
Subscribe to:
Posts (Atom)