Showing posts with label Crafts for kids. Show all posts

Tuesday, 11 December 2012

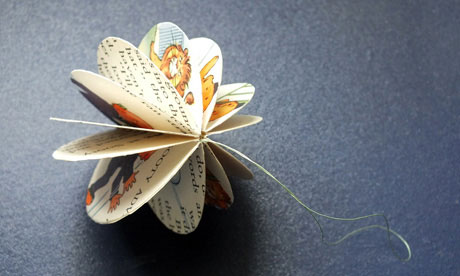
Christmas paper baubles


This is a great craft post found at The Guardian newspaper website: simple, and quick, and ultimate satisfaction! It's a fun pre-Christmas craft to do yourself or with kids. I think it should be pretty easy to do with children from about 8, although a certain amount of patience is needed, and the ability to wield a pair of scissors and cut circles :)


For the project you will need:

●a few sheets of paper ( used vintage children's books, for a mix of text and colour pictures)
●a pencil
●something round to use as a template (like a 5cm-diameter spice jar)●scissors●pritt stick●thread
●sticky tape
 
Procedure: 

○ Place your paper on a flat surface and draw circles around the template. Try to capture any interesting bits of text or colourful drawings, which will make your bauble stand out. You will need 12 circles for each bauble.

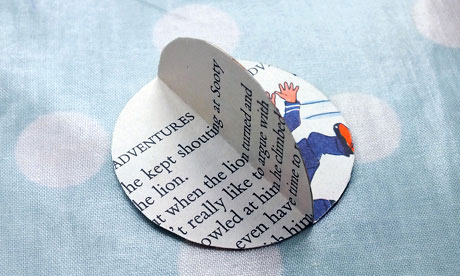
●  Cut out each circle and fold in half, with the side you want to be seen on the inside. Carefully trim any uneven edges if necessary.

● Take a folded circle, glue one side, then stick a second folded circle to it, making sure the straight edges line up neatly. 


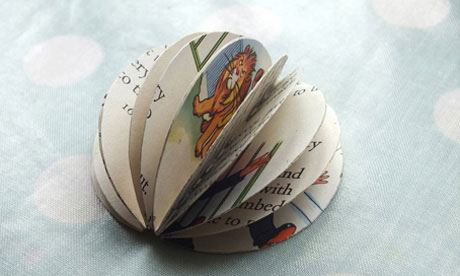
○ Repeat, adding each circle and trimming any uneven edges as you go. DON'T glue the final two sides together yet - we need to add a thread to hang the bauble!
● Cut a length of thread and double it over to create a loop.

● Place your bauble on a flat surface and attach the cut ends of the thread (not the loop) the inside of the bauble with sticky tape(make sure your text/images are the right way up or your bauble will hang upside down!). leave a couple of centimetres of thread to stuck into the globe, to make the loop secure.

(nb In the original design, Katy suggests using glue, but I think sticky tape is easier, especially with kids)
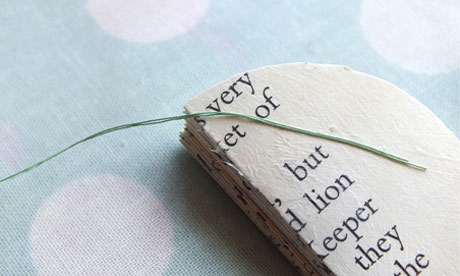


○ Now to finish the bauble. Get hold of the semi-circles at each end and bring them round towards each other, so that the segments fan out into a globe shape. Glue these two sides together, so that the thread is wedged between them. 

● Once the glue is dry your bauble is ready to hang! Experiment with different-sized circles, use more circles to make a denser bauble, or decorate your circles with glitter before you glue them together for some added Christmas sparkle.

Friday, 4 November 2011

The Surin Elephant Roundup


Background:

Every November, Surin, a north-eastern province in Thailand, holds its annual Elephant Roundup, one of Thailand's most popular festivals. The Inhabitants of Surin were renowned for catching and training elephants, who have been a prominent feature of Thai art, literature and legend, thanks to their importance both in labour and war. The Mahout and his elephant have a special relationship; in daily life man and elephant need to depend on each other, and as such the elephant is usually treated as part of the 'family'. This life-long relationship is an integral element of Kui culture, tradition and the way of life.

Nowadays Thai elephants are almost exclusively bred instead of captured due to their dwindling numbers in the wild, and the Surin Elephant Roundup show has been held annually since 1960 to commemorate the importance of the elephant and his trainer. The Roundup takes place over two days and includes an elephant buffet, elephant talent competitions, demonstration of the various techniques used to train elephants, a presentation of ancient elephant warfare techniques, a tug-of-war between men and elephants, and possibly the most popular event, 'elephant football'.


The Craft Class:

The aim of this class is to introduce the concept of the elephant roundup and all the truly amazing things that elephants can do. Vocabulary includes actions and phrases such as 'dance' 'eat breakfast' and 'play games'. Materials include flash cards, a short film, a cut-out elephant, a mask, and various worksheets for early-finishers. You'll also need a projector or laptop, loads of crayons, scissors and some sellotape.
 

For the main project you will need:

●scissors 
●pencils and pens
●cello-tape.

You will also need:

1 copy of the flash cards
A copy of each of the handouts per child
A photocopy of the elephant (printed on card-stock)
A photocopy of the elephant mask (aso printed on card-stock) 
 
Procedure: 

○ Start with a quick game of 'instructions', speeding up little by little as you go (stand up, turn around etc). Add a few new 'animal instructions' and demonstrate what you mean (be a tiger, be a giraffe, be an elephant).

● Show the flash cards and elicit the vocabulary. Act the actions as you go (Dance, Play Football, Play Games, Paint, Fight, Eat Breakfast). Drill pronunciation and stick cards around room for a quick game of 'say and point'.


● Ask kids which animal can do all the actions in the flashcards. Encourage all guesses, but if they don't seem to be getting near, give them a little hint or two. When they've got it, show surprise and ask if they're sure. Then hit 'em with the video! Try to encourage them to call out the actions that the elephants are doing (a bit weird in present simple, but if they're not at continuous stage yet, you can ask them "what can the elephant do" instead or "what is it doing")

Uploaded by on youtube.

○ At this point decide if you want to do a map thing or not. I tend to pull up a world map on the whiteboard and help them find Spain and the UK before letting them guess a bit as to where Thailand is. When they find it I give them the handout and get them to colour and label the 3 countries. I'm doing this with each Craft and Culture class, so the students that come back are getting a bit of a collection!
 
● They are now ready to make their 3D elephants. You've got to keep a really strict eye on time, as they will have to colour in both sides of the elephant, cut them out and still have time for the mask and a worksheet or two!
*ADVICE* Don't do what I did which was to give them the option of colouring-in with pens. It takes too much time and the pens run out! Best to stick to the old favourites: pencils or crayons.


● When they've coloured in the first side, get them to cut them out, flip 'em round and colour the backs. Give them a piece of scrap paper each to protect the tables from wild colouring-in skilz ;) Finally, show them how to cut the slits and construct the elephant, adding a bit of sellotape to the legs and ears as you go so they don't fall off. 


○ As each kid finishes off, you can give them a photocopy of the mask to colour in and cut out. The littler students will need help cutting out the eyes of the mask, and attaching the string.
 ● For early finishers, now is a great time to give out the colouring-in  handouts. Or if you're tight on time, staple them to the back of the map and tell them they can do it at home!

Y ya 'sta! Elefantastic! :D


Friday, 25 March 2011

Spring Flowers


The Craft Class:

A bright and cheerful project to welcome back our long-lost friend Spring!
There are some fiddly bits in this project but I managed it with about 8 students between the ages of 8 and 10 last week, and nine 6-7 year olds today :)

For the main project you will need:

●scissors 
●pritt-stick type glue
●a pencil
●some newspaper (to protect their sticking surfaces!)
●cello-tape.
They will also each need:

FLOWERS
1 pre-cut circle a little bigger than a euro coin
3 strip of yellow or orange card (about 11x3 cm)
12 little squares of different coloured paper (roughly 8x8 cm)

STEMS AND LEAVES
3 wooden skewers (pinchos) cut to 3 different sizes
3 strips of green paper (to wrap around skewers) (about 1,5 x 21 cm)
3 green drinking straws
1 A5 green sheets of paper

POT
One plastic cup (preferably coloured)
One small stone (for the base of the cup)
A small block of polystyrene that fits snuggly into the cup


Procedure:


○ Ask the children what season it is, and drill 'spring'. Draw a flower in a pot on the board and label it together (PETALS, STEM, LEAF, EARTH and POT). Play a couple of memory games, and get the kids to copy the flower on a piece of paper, colour and label it, and finally make a paper frame for the picture. It took more or less between 1/2 hour and 45 mins for the younger lot.


● Give out the pre-cut circles and the small strip of yellow or orange card and get the students to trace around the stencil 2/3 times. Cut out and put aside.


● Next hand out 4 of the coloured squares of paper. The kids can chose whichever colours they want, but it's best to have a minimum of 2 different colours.
Get the kids to cut 4 strips about a centimeter wide of 2 of the colours. Put the rest of the paper to one side for now.
○ Take the first 4 strips and stick one end of each around the circle, making a cross.


● Fold each strip in half and glue the ends to the circle.


● Stick the other 4 strips in the spaces in between, stick, fold, and stick the ends in place again. Put the flower-head aside, and then repeat the whole process 2 more times to end up with 3 complete flower heads.


○ Give the children the A5 green paper, and get to fold it 4 times length ways. Show them how to draw a leaf shape (taking up the full length of the paper). Cut the leaf through all 4 layers. Put 3 of the leaves aside but on the last one, get them to trace around their circular stencils 3 more times. Cut out the circles and put them aside with the leaves.


● Give each child the green strip of paper for the stem and help them to fold it in half length ways. Cut some cello-tape for each of them to stick the sides together, making a long tube. Repeat two more times. (easier version): use drinking straws.


● Take one of the flower heads and glue the end of one of the stems to the back of the flower. Repeat for all 3. Take the three green circles that they made with the leaves and stick them over the stem for the back of the flower.


○ Give them the biggest wooden skewer, and show them how to measure it against one of stems. Tell them they will have to cut the paper straw stem about 3cm up from the bottom of the skewer. Repeat for the other 2 stems and smaller skewers.


● Stick the skewers carefully up the paper stem-tubes, blunt-side first.


● Attach the leaves to the base of the stem, pinch in place and attach with cello-tape. Fold leaf over and down. Repeat for all flowers.


○ Put the stone in the bottom of the plastic cup, fit the polystyrene in as snuggly as possible, and stick the flowers in.


● Finally push the petals in to make them 3D


● If you have any early finishes, you could get them to make mini butterflies to stick on the flowers.


YA ESTA!
:)